Is a new paver patio on your to-do list this summer? Here are 8 steps to create a paver patio!
There’s a lot more to this project than just buying the blocks you like and placing them. Any good patio project should start with thoughtful planning to ensure the end result matches your initial vision. From choosing the patio layout to preparing a proper foundation, you should follow a series of steps for the best results. We break them down in this post. Learn more about the correct steps to creating a perfect paver patio.
8 Steps to Create a Paver Patio
1. Plan and Mark the Area
You should plan accordingly before you start any landscaping project, and a paver patio is no exception. Before you install any patio pavers, there’s prep work that needs to be done, such as:
- First, sketch out a design on paper.
- Measure your project’s area and use stakes and string to outline the space, referencing your initial design.
- Contact your local utility company (Call 811) before you put a shovel in the ground to ensure you’re avoiding utility lines.
- Check with your local municipality to ensure you obtain any necessary permits for the work and comply with any other requirements.
2. Excavate the Site
Once you’ve completed the necessary prep work, it’s time to excavate. For best results, dig down at least 6 inches. If you’re installing pavers in heavy-use areas, consider digging 8 inches or more.
Additionally, it’s important to ensure that there’s a slight slope away from your home (about 1 inch per every 4 feet) to ensure proper water drainage.
3. Add the Base Layer
Many property owners think they can install the patio pavers after they’ve dug the appropriate space, but more prep work needs to be done before this step. First, you’ll want to add a base layer of gravel to ensure your future patio has a stable foundation. Gravel helps create a solid, level surface while also allowing water to drain properly and protect against frost damage.
Spread out your gravel evenly and compact it down with a hand tamper or plate compactor. Keep the surface level while maintaining that slight slope we discussed in the previous step to allow for proper drainage.
Limestone is a great choice for your base layer, largely due to its durability, stability, and resistance to weathering.
4. Add a Layer of Sand
After the base layer is down, add at least 1 inch of coarse sand over it. Sand helps add to your future patio’s stability and also helps distribute weight evenly to prevent uneven settling.
Using a straight board, or screed, and two pipes is best practice to level your sand layer evenly. Unlike the previous step, don’t use a tamper to compact the sand. The patio pavers you install in the next step will naturally take care of that.
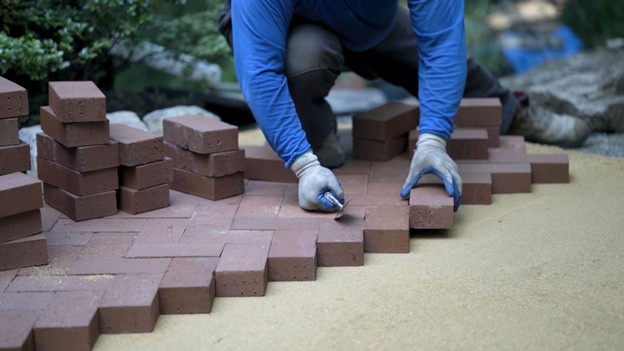
5. Lay the Pavers
Now that you’ve successfully laid the foundation for your patio, it’s time to lay the pavers. Start in a corner of your patio and place the pavers tightly together while following any predetermined pattern. If your pattern calls for uniform gaps, use spacers as necessary. As you place the pavers, gently tap them down using a rubber mallet. Ensure you periodically check alignment by following the string lines you marked the patio with in Step 1.
6. Edge Restraints
Keeping the pavers in their proper places as you lay your patio can be challenging. If pavers shift, it’s likely to throw off the entire shape of your patio. To prevent shifting, install edge restraints. Also commonly known as paver edging, edge restraints help maintain that defined boundary you’ve established for your patio and prevent any shifting as you place the pavers. Edge restraints are removed following the placement of the entire patio.
7. Fill the Joints
Once all the pavers have been placed, the next step is to fill the joints between each block. Do this using polymeric sand or jointing sand. Spread it over the patio’s surface and sweep it into the joints with a broom. If you’re using polymeric sand, lightly mist your patio with water to activate the binding agents.
8. Final Compaction
There’s one more step — and it’s an important one. Grab a plate compactor and place a protective mat over the plate. Next, use it over the entire surface of your patio to ensure that everything is set firmly. Following your work with the plate compactor, refill any settled joints with polymeric sand or jointing sand as necessary.
Contact Kurtz Bros., Inc. Today for Your Landscape Supplies
Now that you know how to create a paver patio, it’s time to put the work in — and Kurtz Bros. is your one-stop shop for the materials you’ll need to complete this project. As a leading provider of gravel, sand, and limestone by the yard, we have what you need to create the necessary base layer. We also carry patio and paver stones, accessories like edge restraints, and other decorative elements you might want to incorporate into your project, like decorative wall stone, lighting, and a fire pit. Contact us today for more information.